Photo noise reduction for mildly noisy JPG, PNG and WebP images. Upload a photo, compare Standard enhancement with the original, and save only if texture and detail remain natural.
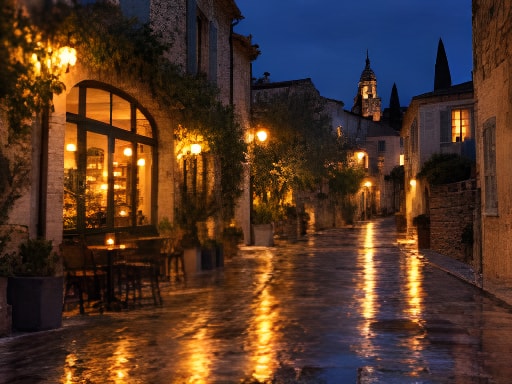
After the street lights come onTry a sample below
Simulated low-quality inputStandard 2× result
Drag the divider or use arrow keys in steps of five percent. Home and End show the full result or original.
Photo denoising aims to make random grain less distracting while retaining real texture. Standard uses the shared enhancement model, with no separate high-ISO engine. Compare shadows, woven fabric and skin below. Every demonstrated result also includes 2× enlargement, so the pairs do not isolate same-size cleanup.
Simulated low-quality inputStandard result
Drag the divider or use arrow keys in steps of five percent. Home and End show the full result or original.
Low light
After the street lights come on
Move the divider over dark paving and walls, then inspect window edges. Check whether visible grain becomes less distracting without replacing it with new lines or losing structure.
256 × 192 → 512 × 384Standard · 2× · face restoration off
Drag the divider or use arrow keys in steps of five percent. Home and End show the full result or original.
Textures
Made to be seen up close
Woven fibers are real detail, not noise. Compare the weave for smoothing, repeated patterns and estimated threads before accepting a cleaner-looking result.
256 × 192 → 512 × 384Standard · 2× · face restoration off
Example originals are AI-generated simulated low-quality inputs, not customer photographs. Comparisons use actual Standard model outputs. Dimensions, scale and settings are shown for each evaluation; results vary by source.
THREE SIMPLE STEPS
Best Photo Noise Reduction Settings for High-ISO Photos
01
Start with the original
Use the camera file and inspect both a shadow area and a textured surface. Export a supported copy if your original is RAW.
02
Try a modest first pass
Choose Enhance photo and Free Standard for an eligible same-size trial. There is no separate denoise-strength slider; avoid enlargement until you know whether cleanup helps.
03
Check the texture tradeoff
Open the 100% view and compare shadows, hair and fabric. Judge noise reduction at the final viewing size too. Keep the original or use a dedicated editor if useful detail becomes smooth or artificial.
Tell noise apart from detail and compression
Tell noise apart from detail and compression
Area to inspect
What it can indicate
What to preserve
Random brightness grain after high-ISO shooting
Limited light and amplified sensor noise
Keep subject texture; higher ISO does not mean every grain-like mark should disappear.
Streaks in a handheld low-light exposure
Camera or subject movement, often mixed with grain
Use a sharper frame; noise cleanup cannot reliably reverse motion blur.
Smooth patches or ghosted edges in phone night mode
Existing multi-frame processing or subject movement
Review faces and moving objects before applying more smoothing.
Colored speckles in an older-camera JPEG
Chroma noise plus processing already baked into the file
Correct distracting color variation without erasing fine color boundaries.
Blocks or ringing after repeated compression
JPEG artifacts rather than sensor noise
Find the original; trying to remove noise from photo copies cannot restore discarded detail.
A CLOSER LOOK
Photo Noise Reduction vs. Image Denoise: What's the Difference
Noise often shows up in shadows and flat surfaces, while real texture belongs to the subject. Good photo noise reduction should make the first less distracting without erasing the second.
Is photo noise reduction the same as image denoising?
Both describe reducing unwanted variation while preserving useful detail. Searching for denoise image usually means the same cleanup task, not a separate model on this page. Look at a dark wall, sky or soft background: luminance noise appears as brightness grain; chroma noise appears as colored speckles. Blocks near edges often come from compression. Fine cloth, hair and grass are real detail. Judge these areas separately rather than expecting every textured surface to look smooth. For deliberately drawn square pixels, use the pixel art upscaler to preserve the grid instead of smoothing it.
Balance luminance and chroma without plastic skin
Standard may improve mild noise together with softness, but this page has no separate luminance or chroma sliders. In an editor with 0–100 controls, a conservative trial is Color 10 and Luminance 0, then increments of 5 while comparing at 100%; these are trial values, not universal settings. Adobe's example ISO-adaptive preset uses luminance 0 at ISO 400, 10 at ISO 1600 and 30 at ISO 6400. Reduce the amount if skin becomes plastic, pores vanish or fabric blurs. Keep some grain when stronger smoothing would erase the subject's texture.
Choose RAW and JPEG processing in the right order
For RAW, inspect exposure and noise in a RAW editor before exporting a supported copy; apply final output sharpening after cleanup and resizing. For JPEG, camera processing is already baked in, so avoid stacking strong denoising onto smooth skin. Use low or normal in-camera high-ISO cleanup when a ready-to-share JPEG is needed, and review texture. When grain remains or controls need local adjustment, work from RAW in post if available. For phone images, keep the camera original. Brightening a dark JPEG or repeatedly saving through social apps can reveal noise or add compression artifacts.
GOOD QUESTIONS
Before you begin.
Can Standard remove all noise from a night photo?
No. It may improve mild noise, but heavy high-ISO noise needs a dedicated workflow. Results depend on how much useful signal the source contains.
Why did noise reduction remove detail?
Fine texture and noise can look similar. Compare hair, fabric and foliage carefully, and keep a result only when the cleanup preserves the subject.
Can I upload RAW files?
This uploader supports JPG, PNG and WebP. Develop the RAW file in your camera or RAW editor and export a supported copy.